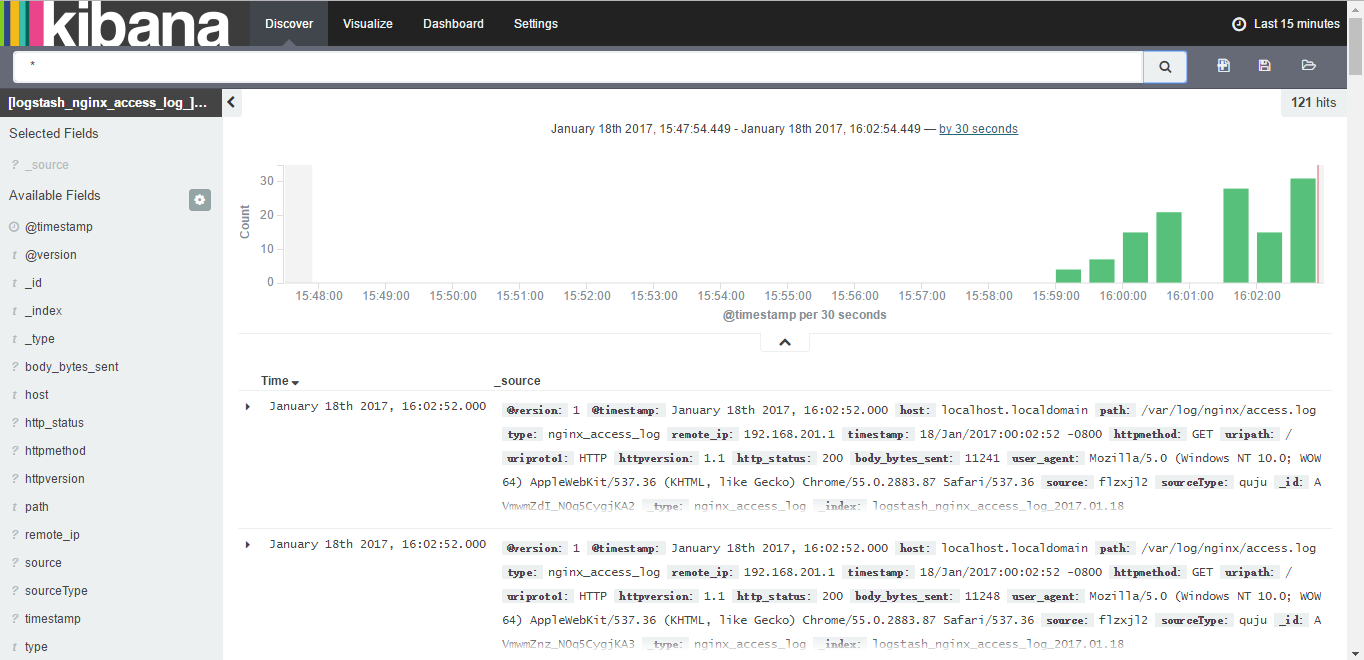
使用nginx logstash redis elasticsearch kibana搭建自己的日志平台,直接先看效果图

流程
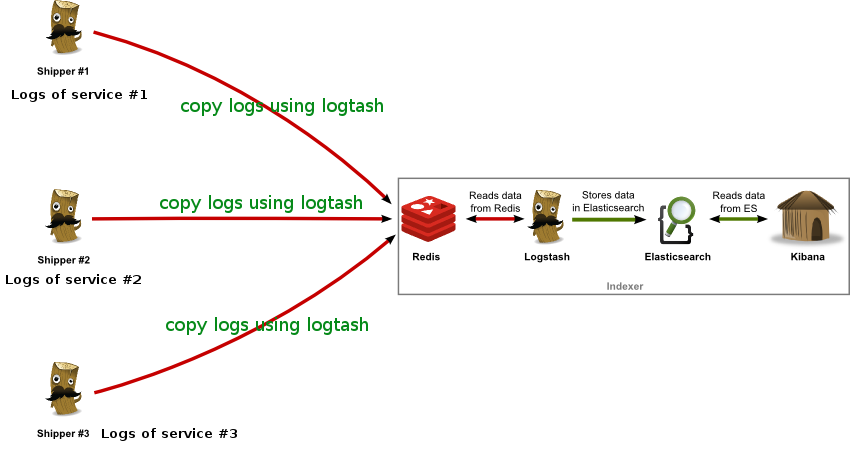
nginx将用户访问的一些信息写入到access.log中,logstash的shipper将日志access.log读取grok后写入redis,indexer再读取redis里的数据存入elasticsearch,最后在浏览器里打开kibana根据index查看并检索数据。看看网上一张很流行的示意图:

服务器角色
服务器分配
- 一台es服务器,部署es、logstash的indexer和kibana
- 一台队列服务器部署redis
- 应用服务器上部署logstash的shipper和nginx
- Server1: 192.168.201.131 logstash indexer elasticsearch kibana
- Server2: 192.168.201.132 redis
- Server3: 192.168.201.133 nginx logstash shipper
角色启动
Server3启动nginx后监听端口记录日志,启动logstash:nohup ./bin/logstash -f etc/shipper.conf,配置文件里指定输入为nginx的访问日志,输出为Server2的redis,过滤自己定义;
软件安装
安装ES
安装jdk 1.8
> curl 'http://download.oracle.com/otn-pub/java/jdk/8u51-b16/jdk-8u51-linux-x64.tar.gz?AuthParam=1439294372_3940ff41eda61ec7b407e569be06384a' -o jdk-8u51-linux-x64.tar.gz
配置环境变量
> vim ~/.bashrc
> export JAVA_HOME=/data/apps/jdk1.8.0_51
> export CLASSPATH=$JAVA_HOME/lib/dt.jar:$JAVA_HOME/lib/tools.jar
> export PATH=.:$JAVA_HOME/bin:$PATH
应用环境变量
> source ~/.bashrc
下载 elasticsearch-1.1.1
> curl 'https://download.elastic.co/elasticsearch/elasticsearch/elasticsearch-1.7.1.zip' -o es-1.7.1.zip
启动es
> /root/elasticsearch-1.1.1/bin/elasticsearch -d
启动后监听 9200 9300 54328 三个端口
redis服务器配置
下载redis
> wget http://redis.googlecode.com/files/redis-2.6.13.tar.gz
安装
> cd redis-2.6.13
> make
> make install
> cp redis.conf /etc/
> make install
启动redis服务
> cd /bin/redis-server
> redis-server /etc/redis.conf
安装logstash indexer
安装ruby
> yum install ruby
> yum install rubygems
下载 logstash-1.5.3
> curl 'https://download.elastic.co/logstash/logstash/logstash-1.5.3.zip' -o logstash-1.5.3.zip
logstash配置文件所在目录
> /etc/logstash/indexer.conf
启动logstash indexer
> cd logstash
> nohup ./bin/logstash -f etc/indexer.conf &
安装Kibana
下载并解压kibana
> curl https://download.elastic.co/kibana/kibana/kibana-4.1.1-linux-x64.tar.gz -o kibana-4.1.1-linux-x64.tar.gz
启动kibana
> cd kibana
> nohup bin/kibana &
安装Nginx
> yum install nginx
> cd /usr/sbin/nginx
> ./nginx -c /etc/nginx/nginx.conf
nginx启动后将日志写入access.log中
配置文件介绍
shipper.conf
input {
    file {
      type => "nginx_access_log"
      path => "/var/log/nginx/access.log"
    }
}

filter {

    grok {
      match => [ "message", "%{IPV4:remote_ip}, (%{IPV4:http_x_forwarded_for}|-) (%{IPV4:remote_user}|-) \[%{MONTHDAY:day}\/%{MONTH:month}\/%{YEAR}:%{HOUR:hour}:%{MINUTE:min}:%{SECOND:sec} %{ISO8601_TIMEZONE:tz}\] %{BASE16FLOAT:request_time} %{HOSTNAME:domain} \"%{WORD:httpmethod} %{URIPATH:uripath} %{URIPROTO:uriproto1}\/%{BASE16FLOAT:httpversion} %{URIPROTO:uriproto2}\" %{INT:http_status} - (%{INT:body_bytes_sent}|\-) (%{INT:bytes_sent}|\-) (%{INT:sent_http_content_length}|\-)  \"(%{INT:sent_http_content_Range}|\-)\"   \"(%{URI:http_refer}|\-)\" \"%{DATA:user_agent}\" (%{DATA:sent_http_x_cacche}|\-) (%{DATA:sent_http_content_type}|\-) (up_addr:%{URIHOST:upstream_urihost}|\-) (up_resp:%{DATA:request_time2}s|\-) (up_status:%{INT:upstream_status}|\-)" ]
    }
    date {
      match => ["timestamp","dd/MMM/YYYY:HH:mm:ss Z","dd/MMM/YYYY:HH:mm:ss ZZ","dd/MMM/YYYY:HH:mm:ss ZZZ","YYYY-MM-dd HH:mm:ss"]
      locale => "en"
    }
    if "_grokparsefailure" in [tags] { drop { } }

}

output {
  redis {
    host => '192.168.201.132'
    data_type => 'list'
    key => 'logstash'
  }
}
indexer.conf
input {
        redis {
                host => '192.168.201.132'
                port => '6379'
                data_type => 'list'
                key => 'logstash'
                type => 'redis-input'
        }
}

output {
        elasticsearch {
                hosts => '192.168.201.131'
                flush_size => 500
                index => "logstash-%{type}-%{+YYYY.MM.dd}"
                document_type => "%{type}"
                idle_flush_time => 5
        }
}
grok插件格式化日志
日志格式默认会已json的格式存放在message里面,不太好看,所以按照固定的格式把它展现出来就很有必要,这里介绍grok过滤;
介绍个网站Grok Debugger,这个网站可以在线直观测试编写的校验代码;而且还把自带的正则库都列出来了,这里介绍入门的编写方法;
比如有nginx手机app访问日志,格式如:
180.153.214.198 - - [04/Jan/2017:08:44:40 +0000] "GET /url.com HTTP/1.1" 200 339530 "-" "Mozilla/5.0 (iPhone; CPU iPhone OS 8_4 like Mac OS X) AppleWebKit/600.1.4 (KHTML, like Gecko) Version/8.0 Mobile/12H143 Safari/600.1.4"

这里可以根据nginx的logformat知道以空格隔开的各个字段都代表什么意思:
180.153.214.198			remote_ip
	-	http_x_forwarded_for
	-	remote_user
[04/Jan/2017:08:44:40 +0000]		时间
"GET /url.com HTTP/1.1"		访问方式,路径,类型,版本
200			http_status
339530			body_bytes_sent
"-"			http_refer
"Mozilla/5.0 (iPhone; CPU iPhone OS 8_4 like Mac OS X) AppleWebKit/600.1.4 (KHTML, like Gecko) Version/8.0 Mobile/12H143 Safari/600.1.4" 			user_agent
知道了每个字段都代表什么意思那就简单多了,对每个字段定义正则,格式为前面是正则,后面是字段名 %{正则:字段},空格也需要加上:
180.153.214.198		%{IPV4:remote_ip}
		-	(%{IPV4:http_x_forwarded_for}|-)	表示可能是 - 也可能是具体IP值
		-   (%{IPV4:remote_user}|-)
[04/Jan/2017:08:44:40 +0000]	\[%{MONTHDAY:day}\/%{MONTH:month}\/%{YEAR}:%{HOUR:hour}:%{MINUTE:min}:%{SECOND:sec} %{ISO8601_TIMEZONE:tz}\] 	'\'是转义
"GET /url.com HTTP/1.1"		\"%{WORD:httpmethod} %{DATA:uripath} %{URIPROTO:uriproto1}\/%{BASE16FLOAT:httpversion}\"
200		 %{INT:http_status}
339530			(%{INT:body_bytes_sent}|\-)
"-"			\"(%{URI:http_refer}|\-)\"
"Mozilla/5.0 (iPhone; CPU iPhone OS 8_4 like Mac OS X) AppleWebKit/600.1.4 (KHTML, like Gecko) Version/8.0 Mobile/12H143 Safari/600.1.4" 			\"%{DATA:user_agent}\"


最后和并起来就是:
%{IPV4:remote_ip} (%{IPV4:http_x_forwarded_for}|-) (%{IPV4:remote_user}|-) \[%{MONTHDAY:day}\/%{MONTH:month}\/%{YEAR}:%{HOUR:hour}:%{MINUTE:min}:%{SECOND:sec} %{ISO8601_TIMEZONE:tz}\] \"%{WORD:httpmethod} %{DATA:uripath} %{URIPROTO:uriproto1}\/%{BASE16FLOAT:httpversion}\" %{INT:http_status} (%{INT:body_bytes_sent}|\-) \"(%{URI:http_refer}|\-)\" \"%{DATA:user_agent}\"
可以把它们放到Grok Debugger里面去测试查看最后的结果,最后的结果为:
	{
  "remote_ip": [
    [
      "180.153.214.198"
    ]
  ],
  "http_x_forwarded_for": [
    [
      null
    ]
  ],
  "remote_user": [
    [
      null
    ]
  ],
  "day": [
    [
      "04"
    ]
  ],
  "month": [
    [
      "Jan"
    ]
  ],
  "YEAR": [
    [
      "2017"
    ]
  ],
  "hour": [
    [
      "08"
    ]
  ],
  "min": [
    [
      "44"
    ]
  ],
  "sec": [
    [
      "40"
    ]
  ],
  "tz": [
    [
      "+0000"
    ]
  ],
  "HOUR": [
    [
      "00"
    ]
  ],
  "MINUTE": [
    [
      "00"
    ]
  ],
  "httpmethod": [
    [
      "GET"
    ]
  ],
  "uripath": [
    [
      "/url.com"
    ]
  ],
  "uriproto1": [
    [
      "HTTP"
    ]
  ],
  "httpversion": [
    [
      "1.1"
    ]
  ],
  "http_status": [
    [
      "200"
    ]
  ],
  "body_bytes_sent": [
    [
      "339530"
    ]
  ],
  "http_refer": [
    [
      null
    ]
  ],
  "URIPROTO": [
    [
      null
    ]
  ],
  "USER": [
    [
      null
    ]
  ],
  "USERNAME": [
    [
      null
    ]
  ],
  "URIHOST": [
    [
      null
    ]
  ],
  "IPORHOST": [
    [
      null
    ]
  ],
  "HOSTNAME": [
    [
      null
    ]
  ],
  "IP": [
    [
      null
    ]
  ],
  "IPV6": [
    [
      null
    ]
  ],
  "IPV4": [
    [
      null
    ]
  ],
  "port": [
    [
      null
    ]
  ],
  "URIPATHPARAM": [
    [
      null
    ]
  ],
  "URIPATH": [
    [
      null
    ]
  ],
  "URIPARAM": [
    [
      null
    ]
  ],
  "user_agent": [
    [
      "Mozilla/5.0 (iPhone; CPU iPhone OS 8_4 like Mac OS X) AppleWebKit/600.1.4 (KHTML, like Gecko) Version/8.0 Mobile/12H143 Safari/600.1.4"
    ]
  ]
}